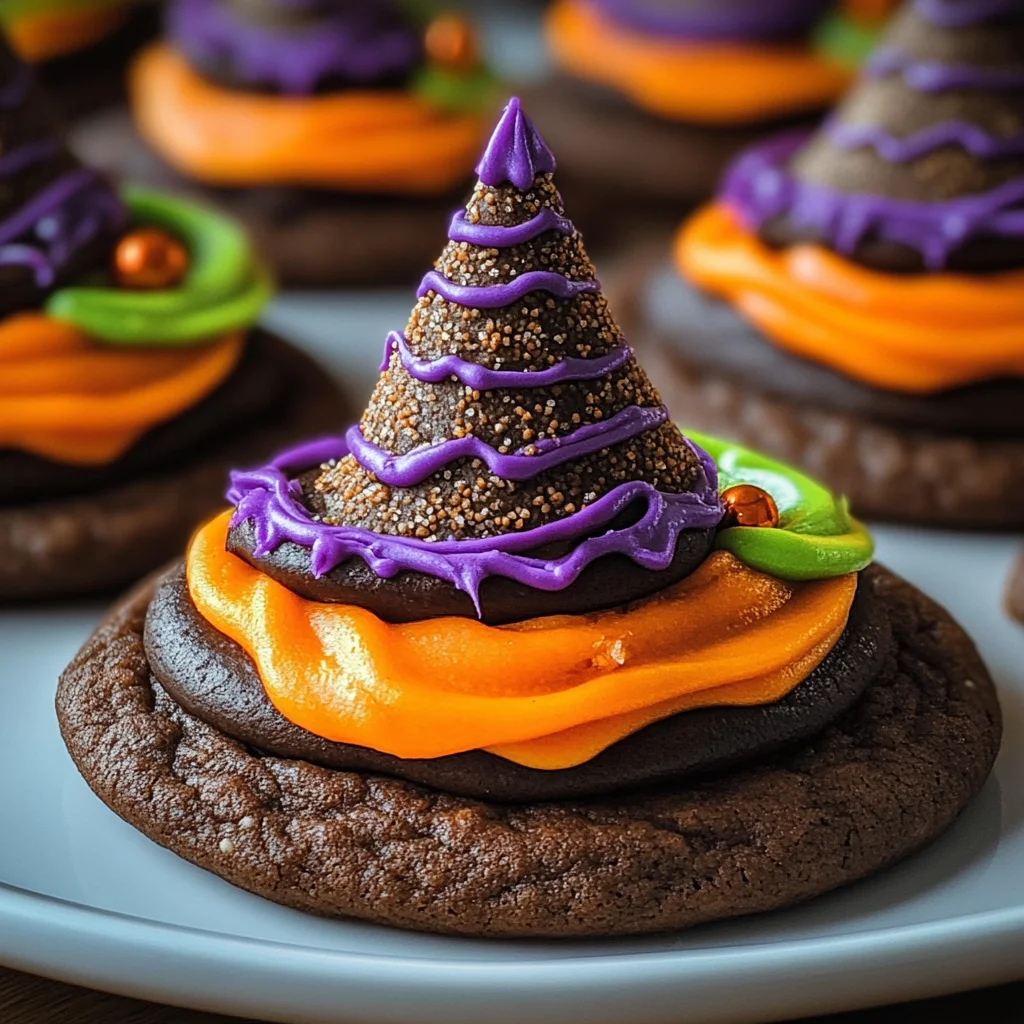
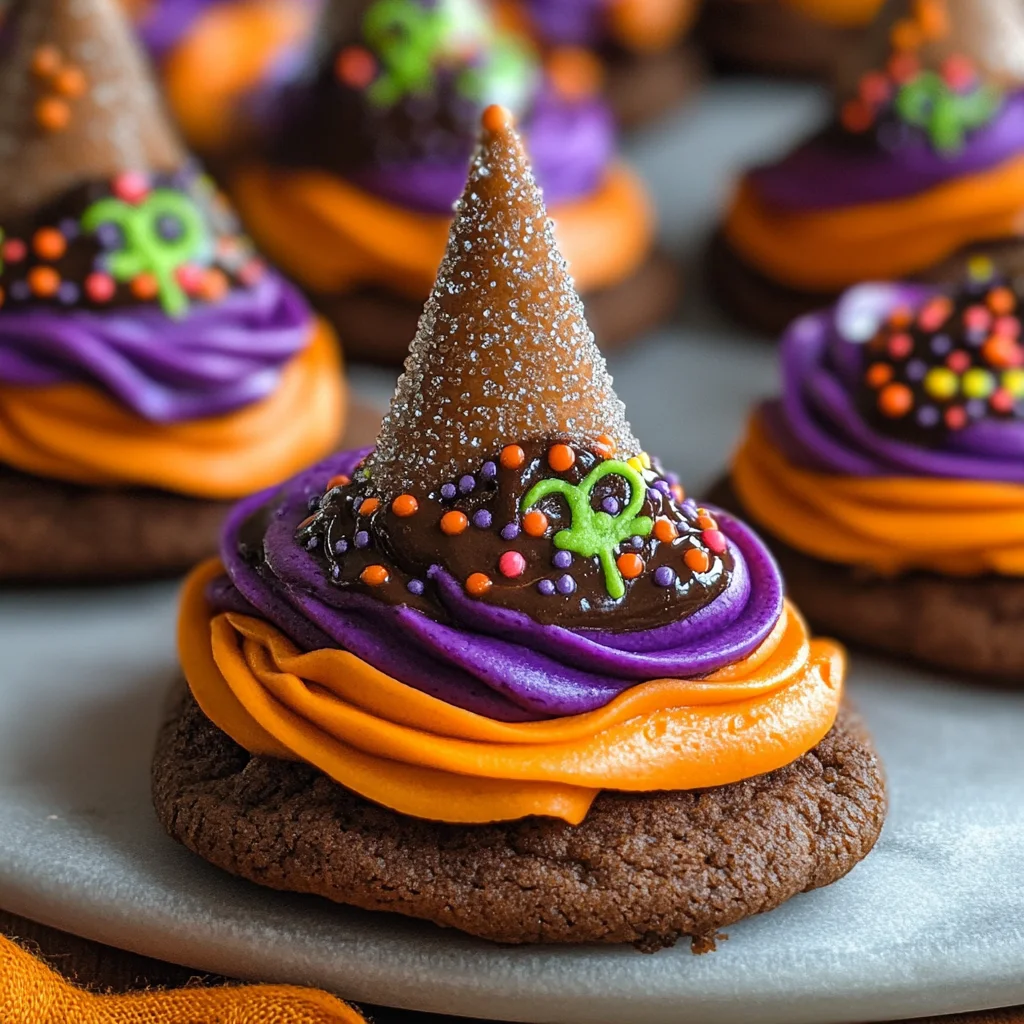
Halloween Witch Hat Cookies
These Halloween Witch Hat Cookies are the perfect treat to impress Halloween party guests. Whether for a spooky gathering or a fun family activity, these chocolaty cookies are easy to make and fun to customize. With their whimsical design and delightful flavors, they are sure to be a hit with both ghouls and goblins alike!
Why You’ll Love This Recipe
- Fun Activity for Kids: This recipe is an interactive way to engage children in baking during the Halloween season. They will love helping to decorate these spooky treats!
- Customizable Designs: You can easily change the colors and decorations, allowing for endless creativity. Make them unique for your celebration!
- Perfect for Parties: These cookies make a great addition to any Halloween spread. Their eye-catching design will attract attention and delight guests.
- Deliciously Chocolaty: The combination of cake and cookie creates a satisfying dessert that appeals to chocolate lovers.
- Easy-to-Follow Instructions: With simple steps, even novice bakers can whip up these delightful witch hats in no time.
Tools and Preparation
Before you start baking, gather your tools. Having everything ready will make the process smoother and more enjoyable.
Essential Tools and Equipment
- Cupcake Cones Baking Rack
- Cookie Sheet
- Parchment Paper
- Decorating Bags
- Spatula
- Knife
Importance of Each Tool
- Cupcake Cones Baking Rack: This tool ensures even baking of your sugar cones, giving them the perfect shape for decorating.
- Decorating Bags: Using piping bags helps achieve precise designs with the icing, making your witch hats look professional.
- Spatula: A spatula is essential for smoothing out icing and ensuring each hat looks neat and tidy.
Ingredients
For the Cake Cones
- Favorite Cake Mix or Try Wilton’s Chocolate Cake Recipe
- Sugar Cones
For the Cookies
- Store Bought Chocolate Cookies or Try This Recipe from Wilton
For the Icing
- Lemon Yellow Icing Color
- Black Color Mist Food Coloring Spray
- Rose Icing Colors Pink Food Coloring
- Violet Icing Color, Gel Food Coloring
- Golden Yellow Icing Color
- Orange Icing Color
- Creamy White Decorator Icing, 4 lb. Tub
How to Make Halloween Witch Hat Cookies
Step 1: Prepare & Bake the Cones
- Prepare the cake mix according to your chosen recipe’s instructions.
- Place the Cupcake Cones Baking Rack on a cookie sheet.
- Insert sugar cones into the rack and fill each cone with approximately 2 tablespoons of cake batter.
- Bake and cool the cones as directed in your recipe.
Step 2: Spray the Cones
- If necessary, trim any risen cake at the top of the cone with a knife.
- Place cones wide side down on parchment paper.
- Using Black Color Mist, spray each cone until fully covered.
- Allow them to dry for about 10 to 15 minutes.
Step 3: Tint the Icing & Prepare the Bags
- In separate bowls, tint 1 cup of creamy white decorator icing orange and another cup purple by mixing violet and rose icing colors.
- Prepare two decorating bags with tip 2B filled with orange and purple icings respectively.
- Also, tint a small amount (¼ cup) of creamy white decorator icing yellow using golden yellow and lemon yellow colors, placing it in a bag with tip 3 attached.
Step 4: Assemble the Witch Hats
- Pipe a small amount of orange icing onto each chocolate cookie’s center before placing a cone on top.
- With tip facing outwards, pipe a band around half of the wide ends of cones using orange icing; smooth with a spatula.
- Repeat this process with purple icing on remaining cookies and cones.
- Let them set for about 15 to 20 minutes.
- Finally, use yellow icing from bag tip 3 to pipe buckles around each hat band. Allow setting for another 15 to 20 minutes before serving.
Enjoy these delightful Halloween Witch Hat Cookies at your next spooky celebration!
How to Serve Halloween Witch Hat Cookies
These Halloween Witch Hat Cookies are a delightful treat that can be served in many creative ways. Whether you’re hosting a spooky gathering or just want to add some fun to snack time, these cookies will surely impress.
With Spooky Themed Plates
- Use Halloween-themed plates to enhance the presentation. Look for designs featuring ghosts, pumpkins, or witch motifs to set the mood.
Accompanied by Milk or Hot Chocolate
- Pair your cookies with a glass of milk or a warm cup of hot chocolate. This classic duo brings out the rich chocolate flavors in the cookies.
As Part of a Dessert Table
- Create a stunning dessert table filled with Halloween treats. Include other themed sweets, like ghost-shaped marshmallows or pumpkin cupcakes, for variety.
Gift Bags for Trick-or-Treaters
- Package the cookies in festive bags tied with orange and black ribbons. These make great gifts for trick-or-treaters or as party favors.
At Halloween Parties
- Serve them on a decorated platter at your Halloween parties. Encourage guests to enjoy them while engaging in games or storytelling.
How to Perfect Halloween Witch Hat Cookies
To make sure your Halloween Witch Hat Cookies come out perfectly, consider these helpful tips:
- Use fresh ingredients – Ensure your cake mix and icing colors are fresh for vibrant flavors and colors.
- Pipe carefully – Take your time when piping icing on the cones and cookies to achieve neat designs.
- Let icing dry – Allow each layer of icing to dry before adding more decorations. This helps avoid smudging.
- Experiment with colors – Feel free to mix different icing colors to create unique witch hats that stand out.
- Store properly – Keep any leftovers in an airtight container to maintain freshness for several days.
Best Side Dishes for Halloween Witch Hat Cookies
Complement your festive cookie treat with these delicious side dishes that fit the Halloween theme:
- Pumpkin Soup – A warm and comforting soup made from roasted pumpkin, perfect for chilly fall nights.
- Spooky Veggie Platter – Arrange veggies like carrots and celery into spooky shapes; serve with hummus as a dip.
- Ghostly Cheese Puffs – Light and fluffy cheese puffs shaped like little ghosts; a savory counterbalance to sweet cookies.
- Eyeball Pasta Salad – A fun pasta salad featuring mozzarella balls (eyeballs) mixed with colorful veggies.
- Witch’s Brew Punch – Create a refreshing non-alcoholic punch using fruit juices and soda; garnish with floating fruit slices.
- Candy Corn Fruit Cups – Layer fruits resembling candy corn colors—pineapple, mango, and bananas—for a healthy treat option.
- Bat Wings Chicken Bites – Crispy chicken bites coated in flavorful sauces give guests something savory amidst sweet treats.
- Creepy Crawly Cupcakes – Decorate cupcakes with gummy worms and spider decorations for an extra touch of spookiness!
Common Mistakes to Avoid
When making Halloween Witch Hat Cookies, it’s easy to make a few common mistakes. Here are some to watch out for:
-
Using Too Much Icing: Overloading your cookies with icing can make them overly sweet and messy. Stick to the piping guidelines for a balanced look and taste.
-
Not Letting the Cones Cool: If you assemble your witch hats while the cones are still warm, the icing may melt. Allow them to cool completely before decorating for the best results.
-
Skipping the Drying Time: Each layer of icing needs time to set. Skipping this step can result in a gooey mess. Allow at least 15-20 minutes between layers.
-
Ignoring Color Mixing Instructions: Failing to mix colors properly can lead to unexpected shades. Follow the mixing instructions closely for vibrant and festive colors.
-
Using Non-Stable Cones: Ensure you have sturdy sugar cones that won’t collapse under the weight of the cookie. Choose high-quality cones for stability during assembly.
Storage & Reheating Instructions
Refrigerator Storage
- Store leftover cookies in an airtight container.
- They will remain fresh for up to 5 days in the refrigerator.
Freezing Halloween Witch Hat Cookies
- Place cookies in a single layer on a baking sheet and freeze until solid.
- Transfer them to a freezer-safe container and store for up to 2 months.
Reheating Halloween Witch Hat Cookies
- Oven: Preheat your oven to 350°F (175°C). Place cookies on a baking sheet and heat for about 5 minutes.
- Microwave: Heat one cookie at a time on medium power for about 10-15 seconds for a soft texture.
- Stovetop: Use a skillet over low heat, covering it with a lid, and warm for about 2-3 minutes.
Frequently Asked Questions
Here are some common questions about Halloween Witch Hat Cookies:
What are Halloween Witch Hat Cookies?
Halloween Witch Hat Cookies are delightful treats made from cake mix and decorated with colorful icing, resembling witch hats.
Can I customize the colors of my witch hats?
Yes! You can use any food coloring to customize your witch hat cookies according to your preferred Halloween theme.
How long do Halloween Witch Hat Cookies last?
When stored properly, these cookies can last up to 5 days in the refrigerator or up to 2 months in the freezer.
Are there alternatives for dietary restrictions?
Absolutely! You can substitute ingredients based on dietary needs, such as using gluten-free cake mix or plant-based frosting options.
How do I make Halloween Witch Hat Cookies less sweet?
To reduce sweetness, use less icing or choose dark chocolate cookies as a base for a richer flavor profile without added sweetness.
Final Thoughts
These Halloween Witch Hat Cookies are not only fun but also versatile! You can easily customize them with different colors and decorations. Whether you’re throwing a party or just indulging in some seasonal fun, these cookies are sure to impress everyone. Try them today and let your creativity shine!
Halloween Witch Hat Cookies

Halloween Witch Hat Cookies are a fun and festive treat perfect for any spooky gathering! These enchanting cookies combine rich chocolate flavors with whimsical designs, making them a hit among kids and adults alike. With their easy-to-follow instructions, even novice bakers can create these delightful desserts that are sure to impress. Customizable decorations allow for endless creativity, making each cookie unique. Whether served at a Halloween party or gifted to trick-or-treaters, these witch hats will add a delightful touch to your autumn celebrations.
- Prep Time: 30 minutes
- Cook Time: 25 minutes
- Total Time: 55 minutes
- Yield: Makes approximately 12 cookies
- Category: Dessert
- Method: Baking
- Cuisine: American
Ingredients
- Cake mix (or Wilton’s Chocolate Cake Recipe)
- Sugar cones
- Store-bought chocolate cookies (or homemade)
- Lemon yellow icing color
- Black color mist food coloring spray
- Rose icing colors pink food coloring
- Violet icing color, gel food coloring
- Golden yellow icing color
- Orange icing color
- Creamy white decorator icing, 4 lb. tub
Instructions
- Preheat the oven and prepare cake mix as directed. Fill sugar cones with batter and bake until cooked through.
- Cool the cones completely. Spray them with black food coloring and let dry.
- Tint icing in separate bowls using food colorings and fill decorating bags.
- Assemble by piping icing onto cookies and attaching cones; decorate with additional icing.
Nutrition
- Serving Size: 1 cookie (30g)
- Calories: 130
- Sugar: 12g
- Sodium: 90mg
- Fat: 5g
- Saturated Fat: 2g
- Unsaturated Fat: 3g
- Trans Fat: 0g
- Carbohydrates: 20g
- Fiber: 0g
- Protein: 1g
- Cholesterol: 10mg